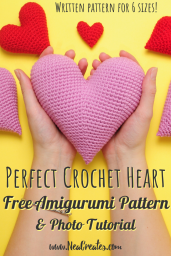
Perfect Crochet Heart: Free Amigurumi Pattern
February 5th, 2019 | 11 Comments | by Nea

So, this is not really a new pattern, but it is improved! This is a version of the second pattern ever, that I posted a couple years ago. The only thing I’ve really changed is I’ve rewritten the joining row to not have any decreases and added some pics, to simplify and clarify. I’ve also added three new sizes! XS, XL and 2XL. You can find the measurements of the different sizes in the pattern specifications below.
The smallest heart is so cute! And with all the different sizes you can really experiment with yarn weights and make anything from little heart keychains to big heart pillows.
If you do crochet any hearts, please share them with me, I would love to see! @NeaCreates



About the pattern
You can buy a bundle of two beautifully formatted PDF versions of this pattern on Etsy. One version uses color, while the other is made in black and white to be more printer friendly.
Add this pattern to your Ravelry queue on the Perfect Crochet Heart Ravelry page.
Disclaimer: This pattern is an original pattern by Nea Creates, it may not be redistributed in any way, shape or form. If you want to share the pattern you may link to the pattern post, you may not repost the pattern on your site. Items completed from this pattern may be sold, provided that you give Nea Creates credit for the pattern and provide a link to the pattern post or the Nea Creates home page.
Size: 2XL: 15x15x7, XL: 13x13x6, L: 11x11x5, M: 9x9x4, S: 7x7x3, XS: 5x5x2 (HxWxDcm).
Difficulty: Easy/Intermediate
Notes: This pattern is written in English, US crochet terminology and SI units are used throughout. I use a smaller hook size than the yarn calls for to get tighter stitches. The heart is crocheted in continuous rounds. All measurements are approximate & will vary with your yarn & tension.
Materials & Tools
- – Yarn calling for 4.5mm hook, e.g. Adlibris Cotton 8/9 / Adlibris Cotton Aran
- – 2XL: 55g/82.5m
- – XL: 40g/60m
- – L: 30g/45m
- – M: 20g/30m
- – S: 10g/15m
- – XS: 5g/7.5m
- – 3.5mm crochet hook
- – Stuffing
- – Stitch markers
- – Scissors
- – Yarn needle
Abbreviations & Stitches used
- R# – Row/round number #
- P# – Picture number #
- N – Note/instruction
- yo – Yarn over
- pt – Pull through
- st(s) – Stitch(es)
- lp(s) – Loop(s)
- ss – Slip stitch
- mr – Magic ring/circle/loop
- sc(s) – Single crochet(s)
- inc – Increase: 2 scs in same st
- idec – Invisible sc decrease (normal decrease works too)
- flo – Front loops only
The Pattern – Perfect Crochet Heart
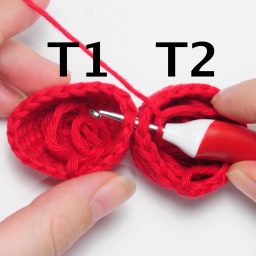
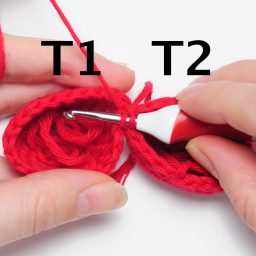
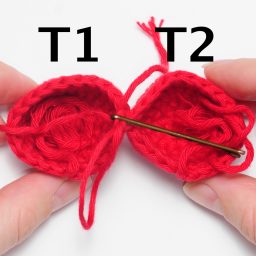
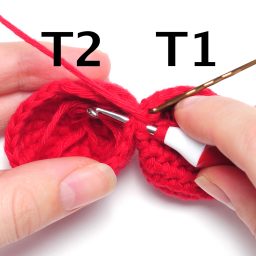
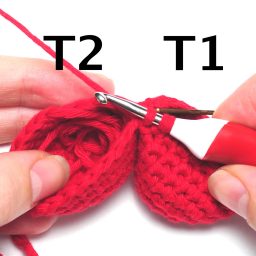
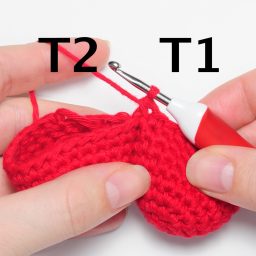
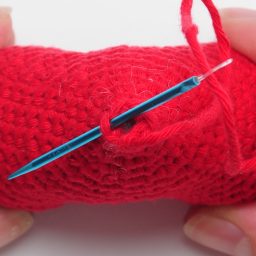


2X Large – Top (2)
R1 6 sc in a mr (6)
R2 6 inc (12)
R3 [inc, sc]×6 (18)
R4 [sc, inc, sc]×6 (24)
R5 [inc, 3 sc]×6 (30)
R6 [2 sc, inc, 2 sc]×6 (36)
R7 [inc, 11 sc]×3 (39)
R8-13 39 sc (39)
N Ss in next st. Cut yarn, yo & pt lp on hook completely, pull to create a knot. (39)
2X Large – End
N Line tops up side by side with yarn tails facing you, in R1 left & right tops are called T1 & T2 respectively.
R1 put a slipknot on the hook & insert it from inside T2 through a st on each top to inside of T1 & sc, mark it for R2 P1-3, continue around T1 with 38 sc, insert the hook from inside T1, through the same sts that you made the first sc in, to inside of T2 & sc P4-6, continue around T2 with 38 sc (78)
R2 [12 sc, idec, 12 sc]×3 (75)
R3 [idec, 23 sc]×3 (72)
R4 [11 sc, idec, 11 sc]×3 (69)
R5 [idec, 21 sc]×3 (66)
R6 [10 sc, idec, 10 sc]×3 (63)
R7 [idec, 19 sc]×3 (60)
R8 [9 sc, idec, 9 sc]×3 (57)
R9 [idec, 17 sc]×3 (54)
R10 [8 sc, idec, 8 sc]×3 (51)
R11 [idec, 15 sc]×3 (48)
R12 [7 sc, idec, 7 sc]×3 (45)
R13 [idec, 13 sc]×3 (42)
R14 [6 sc, idec, 6 sc]×3 (39)
R15 [idec, 11 sc]×3 (36)
R16 [5 sc, idec, 5 sc]×3 (33)
R17 [idec, 9 sc]×3 (30)
R18 [4 sc, idec, 4 sc]×3 (27)
N Stuff & shape continuously from here.
R19 [idec, 7 sc]×3 (24)
R20 [3 sc, idec, 3 sc]×3 (21)
R21 [idec, 5 sc]×3 (18)
R22 [2 sc, idec, 2 sc]×3 (15)
R23 [idec, 3 sc]×3 (12)
R24 [sc, idec, sc]×3 (9)
R25 [idec, sc]×3 (6)
N Make sure heart is stuffed & shaped to your liking. Ss in next st. Leaving a yarn tail for closing, cut yarn & pull out of last st. Weave yarn tail around flo of remaining sts (6), pull to close, then bury it inside the heart P7-9.
X Large – Top (2)
R1 6 sc in a mr (6)
R2 6 inc (12)
R3 [inc, sc]×6 (18)
R4 [sc, inc, sc]×6 (24)
R5 [inc, 3 sc]×6 (30)
R6 [3 sc, inc, 6 sc]×3 (33)
R7-11 33 sc (33)
N Ss in next st. Cut yarn, yo & pt lp on hook completely, pull to create a knot. (33)
X Large – End
N Line tops up side by side with yarn tails facing you, in R1 left & right tops are called T1 & T2 respectively.
R1 put a slipknot on the hook & insert it from inside T2 through a st on each top to inside of T1 & sc, mark it for R2 P1-3, continue around T1 with 32 sc, insert the hook from inside T1, through the same sts that you made the first sc in, to inside of T2 & sc P4-6, continue around T2 with 32 sc (66)
R2 [10 sc, idec, 10 sc]×3 (63)
R3 [idec, 19 sc]×3 (60)
R4 [9 sc, idec, 9 sc]×3 (57)
R5 [idec, 17 sc]×3 (54)
R6 [8 sc, idec, 8 sc]×3 (51)
R7 [idec, 15 sc]×3 (48)
R8 [7 sc, idec, 7 sc]×3 (45)
R9 [idec, 13 sc]×3 (42)
R10 [6 sc, idec, 6 sc]×3 (39)
R11 [idec, 11 sc]×3 (36)
R12 [5 sc, idec, 5 sc]×3 (33)
R13 [idec, 9 sc]×3 (30)
R14 [4 sc, idec, 4 sc]×3 (27)
R15 [idec, 7 sc]×3 (24)
N Stuff & shape continuously from here.
R16 [3 sc, idec, 3 sc]×3 (21)
R17 [idec, 5 sc]×3 (18)
R18 [2 sc, idec, 2 sc]×3 (15)
R19 [idec, 3 sc]×3 (12)
R20 [sc, idec, sc]×3 (9)
R21 [idec, sc]×3 (6)
N Make sure heart is stuffed & shaped to your liking. Ss in next st. Leaving a yarn tail for closing, cut yarn & pull out of last st. Weave yarn tail around flo of remaining sts (6), pull to close, then bury it inside the heart P7-9.
Large – Top (2)
R1 6 sc in a mr (6)
R2 6 inc (12)
R3 [inc, sc]×6 (18)
R4 [sc, inc, sc]×6 (24)
R5 [inc, 7 sc]×3 (27)
R6-9 27 sc (27)
N Ss in next st. Cut yarn, yo & pt lp on hook completely, pull to create a knot. (27)
Large – End
N Line tops up side by side with yarn tails facing you, in R1 left & right tops are called T1 & T2 respectively.
R1 put a slipknot on the hook & insert it from inside T2 through a st on each top to inside of T1 & sc, mark it for R2 P1-3, continue around T1 with 26 sc, insert the hook from inside T1, through the same sts that you made the first sc in, to inside of T2 & sc P4-6, continue around T2 with 26 sc (54)
R2 [8 sc, idec, 8 sc]×3 (51)
R3 [idec, 15 sc]×3 (48)
R4 [7 sc, idec, 7 sc]×3 (45)
R5 [idec, 13 sc]×3 (42)
R6 [6 sc, idec, 6 sc]×3 (39)
R7 [idec, 11 sc]×3 (36)
R8 [5 sc, idec, 5 sc]×3 (33)
R9 [idec, 9 sc]×3 (30)
R10 [4 sc, idec, 4 sc]×3 (27)
R11 [idec, 7 sc]×3 (24)
R12 [3 sc, idec, 3 sc]×3 (21)
N Stuff & shape continuously from here.
R13 [idec, 5 sc]×3 (18)
R14 [2 sc, idec, 2 sc]×3 (15)
R15 [idec, 3 sc]×3 (12)
R16 [sc, idec, sc]×3 (9)
R17 [idec, sc]×3 (6)
N Make sure heart is stuffed & shaped to your liking. Ss in next st. Leaving a yarn tail for closing, cut yarn & pull out of last st. Weave yarn tail around flo of remaining sts (6), pull to close, then bury it inside the heart P7-9.
Medium – Top (2)
R1 6 sc in a mr (6)
R2 6 inc (12)
R3 [inc, sc]×6 (18)
R4 [2 sc, inc, 3 sc]×3 (21)
R5-7 21 sc (21)
N Ss in next st. Cut yarn, yo & pt lp on hook completely, pull to create a knot. (21)
Medium – End
N Line tops up side by side with yarn tails facing you, in R1 left & right tops are called T1 & T2 respectively.
R1 put a slipknot on the hook & insert it from inside T2 through a st on each top to inside of T1 & sc, mark it for R2 P1-3, continue around T1 with 20 sc, insert the hook from inside T1, through the same sts that you made the first sc in, to inside of T2 & sc P4-6, continue around T2 with 20 sc (42)
R2 [6 sc, idec, 6 sc]×3 (39)
R3 [idec, 11 sc]×3 (36)
R4 [5 sc, idec, 5 sc]×3 (33)
R5 [idec, 9 sc]×3 (30)
R6 [4 sc, idec, 4 sc]×3 (27)
R7 [idec, 7 sc]×3 (24)
R8 [3 sc, idec, 3 sc]×3 (21)
R9 [idec, 5 sc]×3 (18)
N Stuff & shape continuously from here.
R10 [2 sc, idec, 2 sc]×3 (15)
R11 [idec, 3 sc]×3 (12)
R12 [sc, idec, sc]×3 (9)
R13 [idec, sc]×3 (6)
N Make sure heart is stuffed & shaped to your liking. Ss in next st. Leaving a yarn tail for closing, cut yarn & pull out of last st. Weave yarn tail around flo of remaining sts (6), pull to close, then bury it inside the heart P7-9.
Small – Top (2)
R1 6 sc in a mr (6)
R2 6 inc (12)
R3 [inc, 3 sc]×3 (15)
R4-5 15 sc (15)
N Ss in next st. Cut yarn, yo & pt lp on hook completely, pull to create a knot. (15)
Small – End
N Line tops up side by side with yarn tails facing you, in R1 left & right tops are called T1 & T2 respectively.
R1 put a slipknot on the hook & insert it from inside T2 through a st on each top to inside of T1 & sc, mark it for R2 P1-3, continue around T1 with 14 sc, insert the hook from inside T1, through the same sts that you made the first sc in, to inside of T2 & sc P4-6, continue around T2 with 14 sc (30)
R2 [4 sc, idec, 4 sc]×3 (27)
R3 [idec, 7 sc]×3 (24)
R4 [3 sc, idec, 3 sc]×3 (21)
R5 [idec, 5 sc]×3 (18)
R6 [2 sc, idec, 2 sc]×3 (15)
N Stuff & shape continuously from here.
R7 [idec, 3 sc]×3 (12)
R8 [sc, idec, sc]×3 (9)
R9 [idec, sc]×3 (6)
N Make sure heart is stuffed & shaped to your liking. Ss in next st. Leaving a yarn tail for closing, cut yarn & pull out of last st. Weave yarn tail around flo of remaining sts (6), pull to close, then bury it inside the heart P7-9.
X Small – Top (2)
R1 6 sc in a mr (6)
R2 [inc, sc]×6 (9)
R3 9 sc (9)
N Ss in next st. Cut yarn, yo & pt lp on hook completely, pull to create a knot. (9)
X Small – End
N Line tops up side by side with yarn tails facing you, in R1 left & right tops are called T1 & T2 respectively.
R1 put a slipknot on the hook & insert it from inside T2 through a st on each top to inside of T1 & sc, mark it for R2 P1-3, continue around T1 with 8 sc, insert the hook from inside T1, through the same sts that you made the first sc in, to inside of T2 & sc P4-6, continue around T2 with 8 sc (18)
R2 [2 sc, idec, 2 sc]×3 (15)
R3 [idec, 3 sc]×3 (12)
N Stuff & shape continuously from here.
R4 [sc, idec, sc]×3 (9)
R5 [idec, sc]×3 (6)
N Make sure heart is stuffed & shaped to your liking. Ss in next st. Leaving a yarn tail for closing, cut yarn & pull out of last st. Weave yarn tail around flo of remaining sts (6), pull to close, then bury it inside the heart P7-9.
All done!
If you made your own Perfect Crochet Heart, please share it with me on social media! @NeaCreates



There is no listed meaning for the “P” listed terms. Following the pattern was easy up until that point. I checked each size, read the diresctions, am I just missing something?
P as in picture, each picture is marked with P1, P2 and so on so that you can refer to the pictures from the instructions. 😊
Hello! I tried to make the xs heart but in the end of round 2 I had 14 stitches instead of 15.
By the way, beautiful patterns! Thank you for sharing them. ❤
Thank you! ☺️ Did you have 18 sts after round 1? It’s pretty easy to miss one of the sts that are close to the join of the tops. 😉
38 plus 38 makes 76 xlarge pattern is totally wrong
Hi! I assume you’re talking about the 2XL size, either way I checked both 2XL and XL and they both seem correct. The top of a 2XL heart has 39 stitches and 39 plus 39 makes 78, which is how many stitches you should have after R1 of the end of the 2XL heart. Hope this makes it clearer. 😊
Fabulous pattern very easy to read and understand, thank you
Thank you! 😊
trying to make this but I don’t unstand the t1 t2 etc
After you’ve created two identical heart tops I’ve named them T1 and T2 respectively to differentiate between them so that instructions like “put a slipknot on the hook & insert it from inside T2 through a st on each top to inside of T1 & sc” make sense with the pictures.